Just wanted to stop by and say HAPPY NEW YEAR to one and all !
I have nothing new to show since we had a very busy Christmas week but hopefully back at the torch very soon !
So, once again, thanks for coming by and I wish you all a Wonderful New Year ! Be safe !

Sunday, December 30, 2012
Sunday, December 16, 2012
More Ornaments or...........................
.............how not to worry about overdoing it. lol ! I mean, might as well go with what keeps one intrigued right - go with the flow as it were. :) I don't know about anyone else, but lately, I have a tendacy to stick with one thing until I'm bored with it or I just can't get it quite "right" according to "them". Since I've been into making ornaments lately, that's what I'm still not bored with and I am getting them right. :) They might not be gorgeous or different shapes but I like how 90% of them are coming out.
Some are large enough that I have to put them in thru the top of the kiln. The bead door on both my kilns just isn't wide enough. With the small kiln, I can only fit a max of 3 of the bigger ornaments in there. That's kind of a bummer cause after making 3 there are days I want to make more. If I could plug in my second kiln at the same time, problem solved. Can't do that though. So, right now, only a max of 3 at a time.
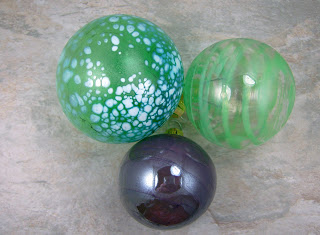
Below are the last ornments I made last week. Didn't get much done due to an illness. Hopefully next week I'll be able to torch a bit. Still alot of fun to make and I am experimenting with different types of glass and many colors.
One BIG thing I discovered while making these fun orbs is that even the bad ones, the ones that turn out uneven or a hole pops thru or the colors of the frit just aren't to my liking - I have shards ! My colleciton of shards is now growing. I've only tried shards a few times but making ornaments, it's a given. lol ! There is ALWAYS something that will go wrong at some point and the shard pile grows because of it ! So one of these days, I'll try adding some shards to the ornaments to see how that goes. :)
.jpg)
Thanks so much for coming by. I hope you come back again soon ! Happy Holidays !
Some are large enough that I have to put them in thru the top of the kiln. The bead door on both my kilns just isn't wide enough. With the small kiln, I can only fit a max of 3 of the bigger ornaments in there. That's kind of a bummer cause after making 3 there are days I want to make more. If I could plug in my second kiln at the same time, problem solved. Can't do that though. So, right now, only a max of 3 at a time.
Below are the last ornments I made last week. Didn't get much done due to an illness. Hopefully next week I'll be able to torch a bit. Still alot of fun to make and I am experimenting with different types of glass and many colors.
One BIG thing I discovered while making these fun orbs is that even the bad ones, the ones that turn out uneven or a hole pops thru or the colors of the frit just aren't to my liking - I have shards ! My colleciton of shards is now growing. I've only tried shards a few times but making ornaments, it's a given. lol ! There is ALWAYS something that will go wrong at some point and the shard pile grows because of it ! So one of these days, I'll try adding some shards to the ornaments to see how that goes. :)
.jpg)

Thanks so much for coming by. I hope you come back again soon ! Happy Holidays !
Friday, December 7, 2012
Ornaments
My infactuation with making blown ornaments has taken me over at the torch lately. I haven't made any beads the typical way, using a mandrel, in a while. No, it's the blown ornaments that have taken all my attention.
The ornaments I've been making were all made off the end of a hollow mandrel using bead release on the ends. I then add the metal cap and hanger after it's cooled off. Making the ornaments using this method, I could use the glass I had on hand. No need to buy anything else which is always the goal. lol ! Another method of creating a way to hang the ornament is that I could of melted the ornament off the mandrel, closed off the hole and added a loop but I had nothing to hold the hot orb so that was out. lol !
I also discovered another method of making these ornaments and had to give that a go as well. More on that later. In the meantime, the photo below is only a sampling of what I've made so far. There is a variety of sizes that I've made. I need to take a photo of all of them together in a bowl or something but haven't done that yet. Right now, I'm hanging them all on metal "tree" I have.
They aren't gorgeous and they aren't unique by any means but they are my firsts and I'm pretty happy with the outcome so far. Of course there have been many that have landed in the water can but that's the beauty of learning - practice - practice - practice ! :)

There will be more ornaments coming to be sure. I'm into it now. lol !
Thanks so much for coming by ! I hope you can come back again soon !
Thursday, November 29, 2012
Something New
Well it's about time I updated here. Geesh. I hope you all had a lovely Thanksgiving holiday !
Since I haven't been at the torch in so long I finally got to spend a little time there yesterday. Only about an hour but I had a whole bunch of fun in that hour ! :) I tried something new to me - a blown ornament. I have been researching this type glassy fun for several weeks now and there are a number of ways to do it.
I decided to go for it using what I have on hand - soft glass (104 coe), frit and a hollow mandrel. Since this was the first time doing such a thing, I did have to melt it down and blow it out several times before I was able to get the round shape. I was surprised I didn't close off the air bubble doing that so many times. Still, in the end, it turned out and I still consider it my very first try.
Pictured below is that ornament. I borrowed a cap from an ornament already on the tree so I'll have to find a replacement. No biggie. :) Remember to click on the photo to get a bigger and better view.

Not too bad I think. I'm going to play some more today and hope for the best. I have 3 mandrels prepped and ready to go. I did place an order for glaskoben to do it yet another way. I'll get into that more when that arrives and I've had a chance to use it. Hopefully before Christmas. :)
I did make a few other beads as well. Just to get back in the swing of things since it's been so long I actually made beads. I used some glass & shards I've had for a couple years and it's just been sitting. Figured it was time to do something with some of it and these are the results.


Thanks so much for coming by ! I hope you come back again sometime soon. I'll be back as usual now.
Monday, November 19, 2012
Happy Thanksgiving !
It's been a very busy week this past week with more coming ! lol ! I have no new beads or jewelry to show this posting. It's a shame really since it's the perfect time of year for me but with the holidays coming there's so much more that has to be done first. So, that said, I hope to get back to the torch after Thanksgiving and have some pretties to show then. In the meantime I hope you and yours have a very Happy Thanksgiving !


Thanks for stopping by ! Come back again next week for an update.
Monday, November 12, 2012
Christmas In The Air
Yes, the holidays are fast approaching with Thanksgiving only 11 days away ! Wow ! I don't know why but it seems like it came really early this year. Oh well, it is what it is as the saying goes.
And of course with Thanksgiving on the horizon, Christmas is only a short 6 full weeks away. Whew. Are any of us ready for that ?? I'm getting there. This year, we will have gifts to put under the tree with family coming in for the holiday for a change. It will be so much fun ! I am so excited ! :)
At the torch last time, I decided it was time to make some blown beads again with the idea in mind to make a few ornaments with them. The bigger blown beads make a perfect size to hang on a tree or from a light fixture or wherever you can think of to hang one for fun Christmas decorating. The blown beads are fun to make on their own of course and making them into ornaments was just one more fun way to use them.
Pictured below are the ornaments. Simple, easy to make and just plain fun to do !
Just take some wire, I used 22 gauge silver coated copper wire, make a wrapped loop at one end. This will be the end you add the hook to hang it with. Once you have the loop done, just add whatever elements you want to add. As you can see from the photo, I added bead caps, Swarovski crystals, lampwork beads and silver plated beads. I then made another wrapped loop and added more elements to that loop with jumprings. I used seed beads, crystals and lampwork beads. Simple and fun to do ! I'm going to add some glitter to the blown beads as well. Maybe add names to them ? Not sure yet. I may still make more but for now, these are it.

This past week just flew by actually. I didn't realize it had been so long I posted. LOTS going on. And it's been over a week now I was at the torch so hopefully more torch time in the coming week.
That's all for now. Thanks so much for coming by ! I hope you come back again soon ! Please feel free to comment. I love to read what you have to say. :)
Thursday, November 1, 2012
Waiting For Motivation Week
Yes, it's been one of those weeks where the motivaton just didn't make itself known. Probably has to do with fighting off the sniffles and it being a losing battle. lol ! Still, I WANT to be at the torch but figure with no motivation, it would be a waste of time and glass. So I just took the week off and have pretty much done, nothing. Nothing creative anyway. I know this happens to everyone at times. Sometimes it can last a VERY long time but in my case, now, it's just the sniffles keeping me down. :( I'll get over it sooner than later. lol !
Since the last time I was at the torch was Sunday, I did manage to make a few things which I will show at a later date. In the meantime, I've posted a couple photo's of a couple of temporary bell flower and leaves bouquets. Temporary because I just needed someplace to put all these bell flowers. :) They will all be sorted out and put in pretty little bouquets with other flowers I've been working on and will be given as gifts. I still have alot of work to do before they are finished. I think they're going to be so pretty though and I hope the receivers will love them.
This bell flower press is such a joy to play with and make these flowers ! I've also been trying different things with the press but those little experiments need work before I can show them. lol ! Right now, I just need to concentrate on the gifts ! lol !


Since it has been such a slow week, that's going to be all for this post. I hope you come back again soon because I will have more new things to show ! :) Thanks so much for coming by ! :)
Thursday, October 25, 2012
Adding Elements to A Lampwork Bead
Today's post is all about making and adding a certain element to a lampwork bead called a twistie. These are little pieces of art all on their own if you ask me. Simple to make to some while a difficult undertaking to others. They add yet another wonderful step in adding design to the glass bead. Pictured just below are the twisties I've made so far this week. I will be making more along with canes. Canes, are yet another element and will be explored further at a later date. :)


As you can see, they come in as many color combinations as one can think of ! The skies the limit as far as that goes as well as how many colors that can be added to a single twistie. For the twisties pictured, I pretty much stayed with up to 4 colors. The sizes you see here range from about 6" in length to a couple that are 20" in length. Twisties are put together using a few different methods and they all work perfectly. The paddle method, adding stinger to a rod of glass, attaching several rods together with a rubber band, etc. Once all the colors are melted in, then you pull and "twist". Depending on how much glass you've added, you can get a pretty long twistie !
I'm sure there are video's on YouTube showing each method but since I rarely go to YouTube I can't connect to any here. Sorry. I would just do a search for lampwork twisties there.
Now that the twisties are ready to use, it's time to add it to a bead. The photo below shows a few ways twisties can be used in a bead. Once again, the skies the limit as far as what can be done with these colorful addtions to a bead ! In the past, I made lots of beads for Beads Of Courage using bright, colorful twisties. Below, the large one on top left is twistie cane encased. The blue donut bead is a twistie melted on top, no encasing. Bottom left is one for the BOC kids, twisties just melted into a white bead and eyes added. The bell flower next to the dime is a red, yellow and orange twistie melted into a press to make the pretty little flower. :) So much more you can do too !

Making twisties to use can be very time consuming but well worth the effort to be sure ! And at the end of the torching day, if you have any tiny nibs of twistie left, you can add them to an "end of the day" bead and end up with a surprise that might be the best bead made all day ! lol !
Thanks so much for coming by. I hope you come back again soon !
Tuesday, October 16, 2012
Lampwork Beads & One Way To Use Them
I showed these flowers a couple weeks ago after I made them and promised I was working on a project to use them in and the day has come to reveal that project ! :) I am so happy to present this necklace I made with my beads and a stuffed silk cord.
I LOVE how it turned out ! The large dark red flowers look fabulous on that stuffed cord as do the pretty little white bell flowers. I thought it would be pretty neat to add some more red to the inside of a couple of those bell flowers. Kinda looks like little berries inside. :) Sweet. The leaves are really pretty in real life too. It's too bad that the shiny silver doesn't show in the photo's cause it's really pretty.

I LOVE how it turned out ! The large dark red flowers look fabulous on that stuffed cord as do the pretty little white bell flowers. I thought it would be pretty neat to add some more red to the inside of a couple of those bell flowers. Kinda looks like little berries inside. :) Sweet. The leaves are really pretty in real life too. It's too bad that the shiny silver doesn't show in the photo's cause it's really pretty.

I wish there was a way for me to photograph the entire necklace but alas, I have major issues in doing that. The photo's end up showing necklaces too far away and too dark. I have the beads size photo tent and not the jewelry size. Still, I think the cord and the flowers show nicely as is.
Thanks so much for coming by ! Please come back again soon and see what's happenin' in my neck of the woods. :)
Sunday, October 14, 2012
The "What Was I Thinking" Post or....................
..........why not just try it and see if it works post...:) So that's what I did. That's always the case anyway when a "new" to me idea pops into my head or into anyone's head. I mean, I know what I'm thinking it should look like so it should end up looking like that. Right ? Nope. lol ! Not most of the time anyway. And sometimes it's just not at all about anything in our minds eye. It's about the end of the day bead. That bead that comes together using elements and/or techniques and/or left over twisties that are laying on the table from the days beadmaking session. You don't want to waste those bits of glass so you put them in the - end of the day bead and hope you get some sort of semblance of a pretty or artistic or at least something nice to look at bead. :) It's usually a surprise how it turns out which makes it even more fun when it comes out of the kiln.
So why do most beadmakers not even show these little gems they are experimenting with ? It's all a part of the process afterall. I think they are fun to look at and especially if there would be an explaination of what they are trying to accomplish. You might be thinking well what about the new beadmakers ? The ones just getting started. Their beads are all experiments, trial and error. Yep, that's true however the difference is, they are learning all about what's already out there, what's tried and true, what it takes to become a flameworker/beadmaker/lampworker.
All that said, I'm going to show you what I made at the torch last session and what my thoughts were at the time. Mind you, they aren't beauties by any means but a path to what I was attempting to do. I'm still "in process" with them which is always the fun part. :) So enjoy and leave a comment or suggestion if you want.


Here they are. In keeping with the flower themes I've been working on lately, these 3 "flower" beads were made a few days ago. The top blue one was an end of the day bead. I had flower petals left over from making another blue flower and wanted to use that pretty light blue glass they are attached to. I am thinking maybe if I had added more petals ??? I doubt it.
The flower bead on the lower left is actually not so bad IF less frit was used on the ends of the petals. I will play with that one more in the coming week I hope. The shape was exactly what I wanted to do however I didn't want that much frit and that much green frit on the ends of the petals.
The last bead. The all blue one on the lower right. sigh. That is the one I had a picture of in my mind, knew EXACTLY how I wanted to make it and this sure isn't the way it was suppose to end up ! lol ! It was suppose to be a flower with nice long petals. Oh well, yet another one to continue working on.
Fun stuff. :))
Thanks so much for coming by ! I hope you come back again soon.
Tuesday, October 9, 2012
I'm Late, I'm Late for a Very Important Date
I didn't realize how late I was to posting here til this morning ! Geesh. So here we go................
Last week was a very slow week for me as I was sick all week and got nothing done. That said, towards the end of the week, the "boredom" kicked in and even though I still can't breath thru my nose, I had to torch. :) I actually started feeling better by Saturday so it wasn't like I was forcing the issue.
Last Monday, I got a delivery of something I had wanted for years but just couldn't justify spending the money. Well I finally decided to "justify" it and my new tool came. A Carlo Dona bell flower press ! Wow ! A true Italian made glass melting tool made by a company that has been in the Italian glassblowing community for decades ! Well known for their quality, innovation and service. Just below is a photo of the exact press I have.

Finally feeling better, I began playing with it towards the end of the week. Wow ! Not only is it fun to use, it makes the most lovely little flowers ! And there is so much you can do with these cute little flowers ! My first "bouquet" is pictured just below and as you can see, there are lots of colors in there. I needed to try various colors just for fun. :) Of course there is a bit of a learning curve with this tool/press which is to be expected but that's ok. Makes it more fun ! What's really very different about this press is there is no place for a mandrel. It is made to be used with wire only. We beadmakers here in the US have learned to use mandrels or work off mandrel when making beads so this was really something that took some getting use to. But using the wire instead of a mandrel also make these flowers ready to add to jewelry or whatever you make with them.


That's all for today. I need to get my day started ! I overslept ! lol ! Thanks so much for coming by. I hope you come back again soon to see what's happening !
Saturday, September 29, 2012
Leaves and Flowers - More Fallish fun
The few days I was able to torch this past week were pretty fun. Only one day it was a bit frustrating. More on that later. I really didn't "learn" anything new. Just kept playing with colors. Some new to me but most colors I've known from the past. I did play a bit more with some heavily laden silver color which is not the norm for me but I was enjoying it so much I just kept at it. :) It gave me no trouble at all either which is a good thing because when this particular color first came out, it gave LOTS of people fits, including me. That glass/color being Double Helix Terra. Not the original Terra but new batches that match the original.
Now alot of people much prefer the multiple colors that you can get from Terra but hate the metallic sheen of it when that pops up. I, on the other hand, like both the lovely colors AND the metallic sheen. Both have their own place/use in a bead. I guess it just depends on what you are going for in that particular bead. This past week, I have been going for whatever color shows up and I really like what's been showing up. :) In fact, I'm REALLY likin' what's showing up ! :)
Check it out. More leaves..............and both sides to show the variations of color and metallic sheen. Granted, the colors probably have never been seen in "real" leaves but remember, this is glass and as with any art/craft, it is only limited to one's imagination. :)


I also made more leaves in other colors and more flowers. My favorite leaves so far are these

In revisiting colors, I remembered about Opal Yellow and how much it reacts to MANY colors. Or maybe it's how many colors react to it ? Either way, the outcome is always wonderful ! I had forgotten just how much I LOVE THIS COLOR !~ And the older the rod, the better the colors that come out of it. I happen to have just a few little rods of some old opal yellow and you can see it in the leaf to the far left. There is some hints of pinkish tones in it and THAT'S the beauty of the older rods. The rods were rich in this buttery yellow and those wonderful pinkish undertones. Yummy. The new rods are lovely as well but nothing compares to the old stuff. sigh......Still, all the leaves turned out lovely I think with the opal yellow base, encased in silver foil then dipped in a wonderful reactive frit I have. I WILL be making more of these for sure. :)
And last but not least - the flowers. To date, the ones below are what I've done so far.

I've had so much fun making all of them that I will continue to make them in more colors. Except for the red poinsettia looking one. I'll be making more of those for a particular project. The roses will all be made using various techniques and lots of colors and sizes. :) Eventually, I'll "delve" into making other types of flowers.
Thanks so much for coming by ! I hope you come back again very soon. :) I love to read your comments so please feel free to get your 2 cents in. :)
Saturday, September 22, 2012
Fall Is In The Air...........
.......even though it's still over 80 degrees today. Still, it's been fairly cool in the mornings which allows me to spend a little bit of time making beads. Yay ! It's suppose to start getting a high of only in the 70's this coming week so more time to play. :) The cooler it gets, the better my days will be. I am a cold weather person anyway.
I've had a great week at the torch. Finally feeling like I never stopped for the summer. Still working on things I have made before but using some new to me colors and experimenting a little bit. Made lots of leaves, some roses and a couple other flowers. All pictured below.
First are the leaves - and lots of them and more coming. What will I do with all of them ? I have no idea. lol ! Maybe a necklace is in order ?

This second set is all the flowers as of today. There are more but they are still in the kiln. I had alot of fun making these. They are done three different ways. The dark red rose and dark yellow rose on the left, closest to the dime, are done with the mandrel coming up thru the middle of the flower. The Yellow rose all the way to the right is done with a base underneath it with the mandrel hole running east to west. The top yellow flower with points on the tips, also done with a base underneath with mandrel holes running east to west. And the last yellow flower, at the bottom, was made on the end of the mandrel and has no hole that runs all the way through. There is one more way I can think of that these can be done and that is off mandrel which I want to try as well. :) Oh and did ya guess, yellow is one of my most favorite colors. ! lol !

I also made some other beads but just not worthy of posting them. lol ! Always a learning experience every time I sit down to melt glass.
This next bead I made following a tut in the Tonbo Dama book. I made this bead long ago once and remembered how much I loved it so wanted to revisit it. In the tutorial, it says to encase it and I didn't. It would of looked better had I encased it. Oh well, live and learn !

Time to get busy and get some work done. Thanks so much for coming by and visiting. I hope you come back again very soon. :) Please leave a comment and let me know what you think.
Friday, September 14, 2012
Back in the Saddle Again.....Or I Should Say, Back at the Torch Again.
Yep, I'm back at the torch again ! Finally ! It seems like it's been sooooooooo long ! :( What a miserable, hot, humid, icky summer it was too. I'm so glad it's over for so many reasons but this is the biggie.
When I'm off the torch for so long, it takes me a little time to get comfortable at the torch again. Nothing serious, just getting to know the flame and the glass again. I made beads on Sunday and have been playing every day since. :) It feels GREAT ! I just can't express how happy it makes me feel to be able to melt glass. I am still amazed at the whole experience and still amazed I am lucky enough to be able to do it. I LOVE MELTING GLASS ! I recommend to ANYONE that if you've never tried it, find a place that has classes and go for it ! You won't regret it. :)
So because I am back to making glass beads, the jewelry will take a back seat. I'll still make some things here and there but mostly I'll be at the torch whenever possible. I'll still make beads for jewerly. I'm in the process of making a set now for a necklace. I am terrible when it comes to making sets of any kind so I stretch it out into many sessions. That way, I don't get bored so fast.
Once again, I've tried a few new things and of course, having ALOT of fun doing it. I picked up some dichoric glass at some point and decided it was time to try it. I had read by many that they had trouble using it and would just give up on it. I found it to be pretty easy to add to a bead. I'm not saying I'm better at it, just that I had no problem with the two pieces I tried. No scumming, no burning off the color, no problem. The photo below is the bead. It was the last bead of the day so it's a very plain bead. I just wanted to see if I could actually add it and encase it as directed. It worked, I'm happy about it and will be exploring this more down the road.
.jpg)
As for the rest of the week, so far, I've been making some wing type beads. I was going in a totally different direction with these when I started them but this is what ended up happening. :) Sometimes the glass says, "THIS is what you're suppose to be doing." lol ! It's good working on these as they are helping me to feel comfortable about sculptural work again. It's been a while.

Of course, there were test beads and beads that ended up in the water can. Plus I also did some fusing. Ugh. That post is for another day. lol ! All in all, a VERY good week !
Thanks so much for coming by ! I hope you come back again very soon ! Please leave a comment as I LOVE to read them. :)
Tuesday, September 4, 2012
How Many Bracelets Can a Person Have ?
lol ! I'm gonna say as many as one can collect ! lol ! Since I started making the kumihimo beaded bracelets, I have added at least 12 to my collection if not more. Where's the rolling eyes when I need them ! lol ! Anyway, eventually I'll be donating to the small local hospital gift shop. I just need to get over there. It's a 30 plus minute drive so it's just a matter of doing it one day. I have enjoyed making them and let's face it, I'll pick a few favorites and those are the ones I'll wear over and over. Isn't that how we do it anyway with most everything we wear ? We have those favorite things that we go to just about every time we step out the door ? Plus I just bought a bracelet from someone that I'll HAVE to wear since I bought it. lol ! That one I'll keep for sure.
I have to say for the several weeks my jewelry making mojo just sorta flew out the door. I do believe it's because I'm ready to get back to the torch but it's still too hot to do that. In the meantime I did manage to put together - you guessed it - a few more bracelets over the weekend. This time, I went in a new direction on three of them. The sad part is the forth one, even after 3 seperate tries, ended up not coming together at all. sigh. It happens and more on that in a moment.
This is what I ended up making. I am VERY pleased with the outcome on all three.

The red one is made with multi color blue beads and my own hand dyed red silk cord/string. I used a different pattern on it rather than the usual one done on these disks. The middle/bottom one is made with multicolored hand dyed satin cording I've had for a while and amber colored beads. There's alot of sparkle and shine in those beads which is hard to see in the photo. The last one is done with frosted rose green magatama beads and let me say, the color is stunning in real life ! The photo does them no justice at all ! I really like how they all turned out very much.
The 4th bracelet I attempted to put together just didn't come together well at all. I tried making a bracelet that all the strands were completely beaded. It's a gorgeous look and I've wanted to do it for a long time. So I tried it - 3 seperate times over the weekend ! I used size 11/0 delica beads too on all 8 strands. The key is tension. I have to figure out the proper tension. If you don't get the tension right, it won't come together well at all. Also, this is where my bead spinner sure came in handy ! lol ! Still, even using the spinner it took some time getting all those beads on those threads. So I will not give up and will try this again soon. I just needed to take a little time away from it before trying it again. I mean, I didn't want to have to pick up any tiny seed beads off the floor after I threw them at the wall ! lol !
Thanks for coming by. I hope you come back again soon.
Monday, August 27, 2012
There's a First Time For Everything
Well, almost a first time anyway. I've rarely had nothing to show of my efforts for a whole week but this time I sure don't. I haven't had a chance to work on anything this past week plus my mojo seems to have disappeared. No ideas coming to mind. What others call their "muse" I guess. I've never had a muse so I have no idea what that would do to help me. Plus being busy with other things that need my attention. I call it life getting in the way. :)
I do know I'm VERY anxious to get back to the torch and make beads so it could be that's blocking any creative flow in making jewelry ? Or maybe I'm just bored ? Or maybe it's time to start something new ? I have just about everything I need to start etching on copper. But if I'm that anxious to get back to the torch, that might be too much of a distraction to start something new. lol ! I'll just have to figure it all out and get to it ! geesh..............
As for an absolute first time for everything - over the weekend DH and I went to the nearest outlet mall and I discovered a new to me shoestore ! The shoes actually FIT and are actually COMFORTABLE. I was shocked because for me, it's always been a HUGE challenge to find both of those traits in a shoe. I have a rather large foot. The brand is SAS and yes, they are pricey but for me, who has so much trouble, the price is worth me not having that shoe shopping headache ! YAY ! I bought only one pair of shoes there but my goodness, are they AWESOME ~! I also went into Easy Spirit which the tennis shoes will usually fit but they usually don't have my size and again had another first ! I told the sales lady the size I needed and she started pulling shoes out left and right ! That store NEVER had my size in stock the three times I had been there before ! It was a good shoe day for me. I bought 4 pairs of tennis shoes at BOGO at 1/2 off. I'm set for a VERY long time on shoes ! :))
Since I have no new beads or jewelry to show, I'm putting up a few pics of some older things I made. I hope you enjoy the little show. :)
Thanks much for coming by. I hope you come back again soon.


Sunday, August 19, 2012
Beaded Kumihimo - The Learning Continues
It's been one of those weeks that seemed to just fly by yet while going thru it seemed to move so slowly. lol ! Does that even make sense ? I don't know but that's how it felt. :)
I had time for only one beaded kumihimo project and that was a stretch. Just so many other things happening. At least some of those things were things I was able to accomplish something worthwhile. ;) So, on to the one bracelet I did make last week.
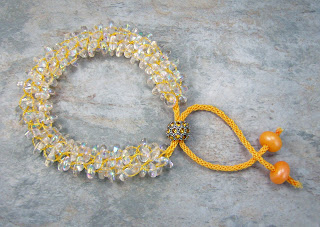
I always wanted to do something in just yellow. I love the color yellow. It's a bright, happy color and has always made me smile. Whenever I make bright color beads, yellow is the first color I reach for. So it just made sense to do this bracelet. I used yellow cording and clear beads. I wanted the yellow color to come thru the beads. A perfect match. :)
The second thing I wanted to do was add a slider bead as a closure. This makes this bracelet adjustable to fit lots of different size wrists. Pretty nifty idea ! This has been done before and I saw it on a forum I belong to and I've wanted to try it with a lampwork bead. Evidently I didn't have the right size mandrel for that purpose so I bought some thinking they would work. According to my calculations, they shouldn't work. They measure too big but I will give them a try when I get back to making beads.
I decided to try something else for the time being - the little beads that fit onto those European bracelets. That's the middle bead on the bracelet below with the tiny crystals in it. The hole seemed big enough and sure enough they slide right on. Problem is, they also don't hold tight enough. That said, I began a search and found an insert that might help it to hold. If that insert doesn't work then there is another one, different size and shape that might work. So whatever ends up happening, I'll figure out how to make it hold. Making a clasp type closure like this is pretty cool and less expensive than adding all the findings on the ends. :)
Two versions of the same bracelet. First photo shows the bracelet with two of my lampwork beads on the ends. The second photo shows it with what is called "stopper beads" on the ends. I didn't have any gold color stopper beads so had to use the silver color ones. Both the lampwork and the stopper beads worked great !
So, what do you think ? I love it. :)

That's all for now. Thanks so much for coming by. I hope you come back again soon for a visit. Please leave a comment. I love reading what you have to say. :)
I had time for only one beaded kumihimo project and that was a stretch. Just so many other things happening. At least some of those things were things I was able to accomplish something worthwhile. ;) So, on to the one bracelet I did make last week.
I always wanted to do something in just yellow. I love the color yellow. It's a bright, happy color and has always made me smile. Whenever I make bright color beads, yellow is the first color I reach for. So it just made sense to do this bracelet. I used yellow cording and clear beads. I wanted the yellow color to come thru the beads. A perfect match. :)
The second thing I wanted to do was add a slider bead as a closure. This makes this bracelet adjustable to fit lots of different size wrists. Pretty nifty idea ! This has been done before and I saw it on a forum I belong to and I've wanted to try it with a lampwork bead. Evidently I didn't have the right size mandrel for that purpose so I bought some thinking they would work. According to my calculations, they shouldn't work. They measure too big but I will give them a try when I get back to making beads.
I decided to try something else for the time being - the little beads that fit onto those European bracelets. That's the middle bead on the bracelet below with the tiny crystals in it. The hole seemed big enough and sure enough they slide right on. Problem is, they also don't hold tight enough. That said, I began a search and found an insert that might help it to hold. If that insert doesn't work then there is another one, different size and shape that might work. So whatever ends up happening, I'll figure out how to make it hold. Making a clasp type closure like this is pretty cool and less expensive than adding all the findings on the ends. :)
Two versions of the same bracelet. First photo shows the bracelet with two of my lampwork beads on the ends. The second photo shows it with what is called "stopper beads" on the ends. I didn't have any gold color stopper beads so had to use the silver color ones. Both the lampwork and the stopper beads worked great !
So, what do you think ? I love it. :)


That's all for now. Thanks so much for coming by. I hope you come back again soon for a visit. Please leave a comment. I love reading what you have to say. :)
Sunday, August 12, 2012
A Week Later......................
Doesn't seem like it's been a whole week already but that's what the calendar says. This past week sure went fast. I've kept busy still playing with beaded kumihimo. It's so addicting, alot of fun and can be very interesting too. I explored using new to me types/shapes of beads. Some fun, some not fun at all. lol ! So without further ado, here's what I've been up to.................
The first photo is of the three bracelets that made it thru to the end. lol ! On the left, glass pony beads. Yep. I didn't know they exsisted and the ones I used are not uniform in shape at all which makes that bracelet really cool ! I love the texture of it even though it's hard to see in the photo. And CHUNKY. Pretty big in diameter measuring in at 13 mm ! And yet it's not heavy at all. The one on the right - those are tiny glass lentil beads in sizes 6mm and 8mm. I can safely say and promise right now I will NEVER use those 6mm lentils EVER again. What a pain to string. The 8mm, maybe. And that bracelet measures in at almost 15mm and it's not heavy either. My favorite of the three, the yellow, orange and red one. LOVE it ! It has 6mm, 8mm seed beads and square seed beads in it. Reminds me of fruit salad ! YUM.
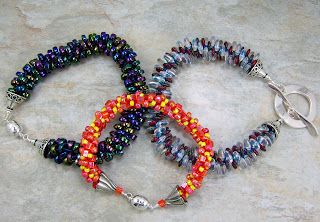


The first photo is of the three bracelets that made it thru to the end. lol ! On the left, glass pony beads. Yep. I didn't know they exsisted and the ones I used are not uniform in shape at all which makes that bracelet really cool ! I love the texture of it even though it's hard to see in the photo. And CHUNKY. Pretty big in diameter measuring in at 13 mm ! And yet it's not heavy at all. The one on the right - those are tiny glass lentil beads in sizes 6mm and 8mm. I can safely say and promise right now I will NEVER use those 6mm lentils EVER again. What a pain to string. The 8mm, maybe. And that bracelet measures in at almost 15mm and it's not heavy either. My favorite of the three, the yellow, orange and red one. LOVE it ! It has 6mm, 8mm seed beads and square seed beads in it. Reminds me of fruit salad ! YUM.

I wanted to showcase this lampwork bead I made long ago and never had a chance to use it in anything. Finally came up with this beaded kumi necklace. I'm not a lover of green anything but this necklace turned out pretty I think. :) I'm happy with it.

The last necklace was more a test than anything but I think it turned out pretty ok. It's got 3 different size seed beads in it again with 6mm, 8mm and square. All are clear and it's braided on multicolor cording. Enjoyable. :)
Not sure what this upcoming week will bring but am looking forward to doing more playing of course. Today though, I am off to play on my torch !!!!!!!!!!! YAY ! It's finally just cool enough I can make beads again. At least for a little while this morning.
Thanks so much for coming by. Please come back again soon to see what's happening in my neck of the woods - literally. lol !
Sunday, August 5, 2012
Keeping it Fresh - Post Edited
Post removed. It was time as it was a bit outdated. As much as beaded Kumihimo was a huge part of my life for a time, it no longer is therefore the clean up continues.
I am back to what I have always love doing - making glass beads - melting glass - lampworking - flameworking - torching. Whatever one wants to call it. It has been a part of my soul for over 10 years (on and off due to no torching in the summer) and always will be. I even quit for about a 2 year period thinking that was it. Uh uh, nope, it sure wasn't. I've been back now for a while and LOVE IT just as much as I first did. Only difference now is I'm back to simple, basic stuff. My hands are older and can tolerate only so much. lol ! Anyway, sorry this is not what you were expecting when you clicked on the link.
Come on over to my Facebook page for a look. There are beads that would be PERFECT for adding to your beaded or not beaded kumihimo piece. Also have hand dyed silk cords there as well as in my Etsy shop.
My Facebook page link https://www.facebook.com/AllMyBeads
Thanks for coming by. Please feel free to check out all my other Blog pages.
Some eye candy for you. My bellflower headpins/charms. On my Facebook page for sale.

Bracelet and Earring set made with my own lampwork beads on my Facebook page for sale.

Silver and gunmetal beaded Kumi bracelet. Fits three sizes. Contact me on my Facebook page or Etsy shop if interested in this bracelet.

Saturday, July 28, 2012
Edited Page
Original post was removed due to it being outdated. There are HUNDREDS of pages of free information out there about Kumihimo, beaded and not beaded. Just search the web and be amazed !
In the meantime, come on over to my Facebook page for all of my hand made items. Lampwork beads, hand dyed silk cords/strings, jewelry and braids.
JEWELRY SUPPLY DESTASH ALBUM - All My Beads Jewelry Supply Destash
Link to my Facebook page - https://www.facebook.com/AllMyBeads
Thanks for coming by. :)
Friday, July 20, 2012
Beaded Kumihimo
This page has been edited due to the fact there is so much on the web now about Kumihimo that my information was a bit outdate. Do a search and you will be amazed at what comes up.
Links to my Facebook pages. First one is a jewelry destashing album which has kumihimo end caps and much more. I WILL have MANY kumihimo making supplies listed so check back often.
Second one is to my page.
ALL MY BEADS JEWELRY MAKING SUPPLIES DESTASH
https://www.facebook.com/AllMyBeads
Two of the first beaded kumihimo bracelets I made. There are so many more I've lost count.
.jpg)
.jpg)
ALL MY BEADS - FACEBOOK PAGE
Saturday, July 14, 2012
Beaded Kumihimo Part II
Since the weather just won't relent and cool down, there is still no torch time for me. sigh. My energies are still focused, intensly, on beaded kumihimo. In between making those beaded braids, I did manage to put together a couple of necklaces using kumihimo braids and beads I made specifically for a necklace or two as mentioned in a prior post. Oh it was so much fun making braids again on my Marudai ! Anyway, it's about time I put these up. :)
I did not make any more beads as I thought I might. The heat wave was fast and furious around here ! lol ! I had alot of fun putting these two necklaces together. The tough part was deciding how many beads to use on the first one. The first one is the round braid. I used my new 2mm satin cording to make that braid. I used two colors even though they are hard to tell apart. A light blue and a very pale seafoam green. It turned out great I think.
A little background on this necklace. The original tutorial I bought calls for a 9mm round, stuffed silk cord. These are IMPOSSIBLE to find in the US ready made and I couldn't find anyone willing to make one. I would of had to buy from over seas and the charge for shipping alone was ridiculous so I decided a round kumi braid would work just as well - and it did.
For the second one, I decided to mix it up a bit and made a flat kumi braid. It worked out just fine. :) I used more brand new 2 mm satin cording in a beige with a coral worked thru. I love the pattern. :) All in all, the necklaces are something I personally won't wear but they were fun to put together. It's not that I don't like them - I just don't wear necklaces. Haven't for a VERY long time. lol ! They get in my way. lol ! Make sure to click on the photo's to get a larger view. :)


So along with the necklaces, I have been playing with beaded kumihimo bracelets and may I say, I am so addicted to it ! I knew I would be since I loved making kumihimo braids from before. This is just the icing on the cake or the tip of the iceberg or whatever cliche' would be appropriate here. lol ! Point is, I'm really having ALOT of fun with it. :)
I'll save all that for the next post. Which I know I won't wait a week to do ! lol !
Thanks so much for coming by. I hope you come back again soon. :)
Subscribe to:
Posts (Atom)